
Fig 1 – Printer Settings
Preparing 3D Print Files for the Bambu Labs Printers
Before you begin: Work locally. Always start by moving your file to the desktop. Opening and printing files from a USB (or other) drive can create problems.
1. The software that prepares models for 3D printing on the Bambu Labs printers is called Bambu Studio. Open Bambu Studio and click on the Prepare Tab at the top.
In the printer section (upper left), make sure that the following settings are selected (note: jobs that do not have these settings properly set may be rejected from the queue)
- Printer: Bambu Lab P2S
- Plate: Textured PEI Plate
- Nozzle Diameter: 0.4
- Nozzle Flow: Standard
Under Project Filaments, select PLA Basic.
(You may use any 3D modeling software that you are comfortable using to create your file, as long as you are able to output it as an .stl.)
2. Open your .stl file in Bambu Studio, by clicking the to the “Add” icon on the toolbar, and then select your .stl. (Note: large .stl files may take several minutes to load.)
3. Additional models may be added by clicking the “Add” button.
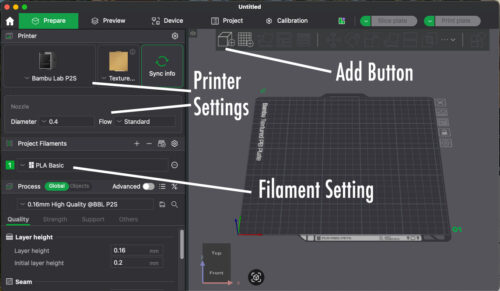
Fig 1 – Printer Settings

Fig 2 – Adjusting the Model
Splitting the Model
4. Orient and size your model for printing. Generally, printing in or near the middle of the plate is best. Also, be sure to orient your model to minimize overhangs and for the easiest removal of support material. Select your model by clicking on it. Then select the appropriate tool from the menu bar on the top to modify your print.
The Move button allows you to shift the position on the plate, the Rotate button rotates the model on multiple axes, and the Scale button changes the size of the model.
Models that overlap or fall off the edge of the build plate will throw up red error boxes. Models too large for the build plate may be split into multiple pieces using the Cut Tool
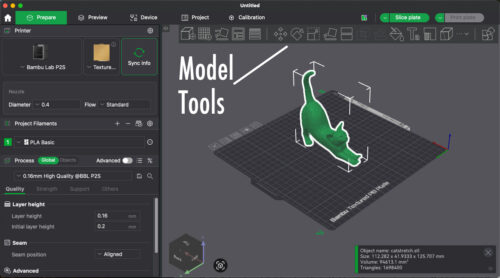
Fig 2 – Adjusting the Model

Fig 3 – Process Settings
Process Settings
5. The default settings work well for most models, but YOU MUST ENABLE SUPPORTS FOR ALL MODELS and there are some other settings that – depending on your model – you may want to adjust.
Quality: Select “0.20mm Standard @BBL P2S” from the presets dropdown for more jobs. For finer detail models, select “0.16mm High Quality @ BBL P2S” from the dropdown. This will decrease layer height and slow print speeds, which is good for higher resolution prints, but it will increase the time it takes for the job to print.
Strength: Again, the defaults are typically good here. For models with very fine/fragile elements, you can strengthen them by setting Wall Loops to 3 (default is 2) or increasing the Sparse Infill Density to 25-30% (default is 15%). This will increase print time and material usage, but will result in stronger parts when needed.
Support: ALL jobs should have supports enabled. Click on the Support Tab and check the “Enable Support” box. For Type, normal (auto) is the most reliable option. Tree (auto) can use less material and be easier to remove and clean up, but can sometimes be too weak for models with lots of overhangs. Use tree supports at your own risk!
Enable the Advanced toggle and set Raft Layers to 2. This will increase adhesion on to the plate, which decreases the chance of warping or failed prints.
Do not make any adjustments to the Speed or Others tabs.
6. When your print is ready, select Slice Plate (green button on the top right). Note: this process may take several minutes depending on the size of your print.
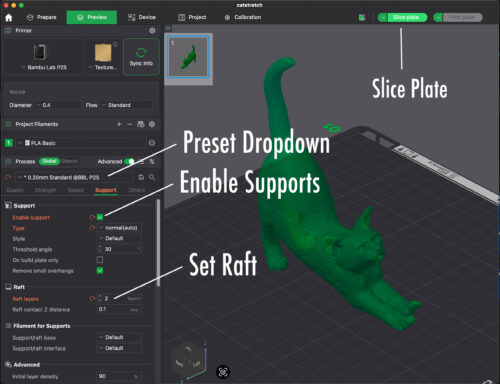
Fig 3 – Process Settings

Fig 4 – Sliced File Preview/Export
Review Slicing and Submit
7. When your print is sliced, Bambu Studio will show you a preview of your model with the supports added. You can use the slider on the right to inspect the cross sections of your model at different heights throughout the print. It is a good idea to do a quick visual check of your file for any unsupported overhangs or other problems.
On the upper right portion of your screen you will see a Slicing Results panel that will tell you your estimated Total Print Time and estimated Total Material Used (in grams). Note these numbers for your submission form. (Note: ignore the estimated cost in this panel, it is not an accurate estimate)
If something does not look correct, click back to the Prepare tab and re-adjust your print settings and run Slice Plate again. If everything looks good, click the down arrow on the right-most green button and select Export Plate Sliced File, then click Export Plate Sliced File to save your printable .gcode.3MF file.
8. Submit your .gcode.3MF file online at: http://go.illinois.edu/art3DPrintRequest
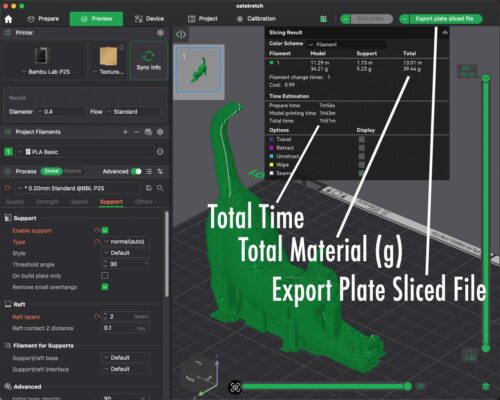
Fig 4 – Sliced File Preview/Export