Editing a Digitized Embroidery File
Before you begin: Work locally. Always start by moving your file to the desktop. Opening and editing files from a USB (or other) drive can create problems.
This tutorial assumes that you are starting with an already digitized file. If you have not yet digitized your file, see the tutorial Digitizing an Image for Embroidery.
Save your work frequently. Go to File>Save As> and choose the “Bernina All-in-One V8” file type (.ART80).

Fig 1 – Pull Compensation
Pull Compensation
Select All (Ctrl-A), navigate to the menu at the top of the screen Settings>Effects and in the Effects pop-up, select the Others tab. Set Pull Compensation to .40mm.
This setting compensates for the pulling of thread on fabric by slightly overlapping shapes to eliminate gaps between them. You should boost the Pull Compensation from its default of .20mm to .40mm on most objects that you are digitizing.
Some small details such as small type or small objects not situated next to other colors may experience a degredation of clarity or quality in this step. You may omit these objects if you prefer.
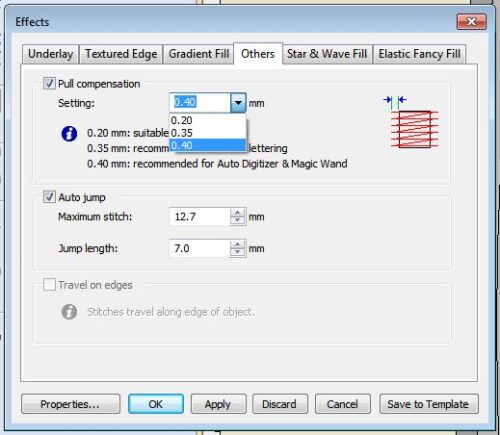
Fig 1 – Pull Compensation

Fig 2 – Fill Types
Fill Types
To adjust the fill type of an object, right-click on the object, select Object Properties, then the Fill Stitch tab. See the sample books for examples of various types of fills.
You may also adjust stitch spacing and length in the Fill Stitch menu. You can use the Stitch Angle tab to adjust the direction of the stitch. In Effects you can add a Wave Stitch pattern which allows for curving the direction of the stitch.
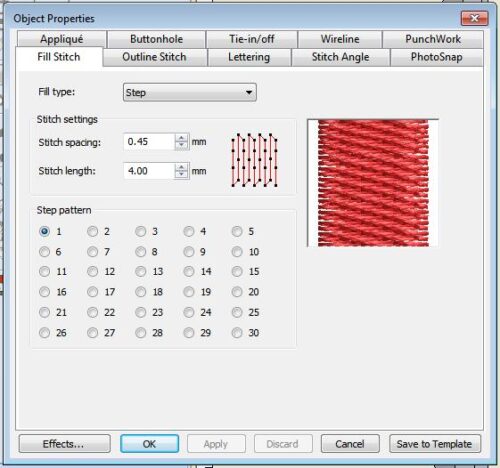
Fig 2 – Fill Types

Fig 3 – Outlines/Fills Menus
Outlines
To make an object with a fill into an outline, select the object, then select an option from the Outlines menu at the bottom of the screen. Right-click the outline selection menu to adjust outline properties.
In the Edit Toolbox, you can use the Outlines and Offsets menu which allows you to add an outline to a filled object while retaining the fill pattern.
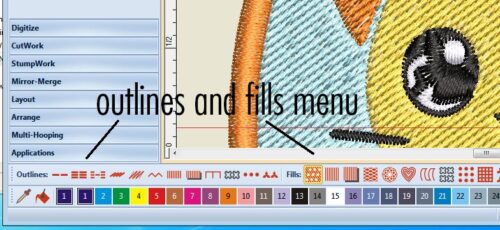
Fig 3 – Outlines/Fills Menus

Fig 4 – Reshaping
Reshaping
The Reshape tool (H) allows you to adjust the shape of objects that have been digitized. To reshape, you must select first with the Select tool (O), then use the Reshape tool (H) to edit.
The Select tool (O) highlights objects in pink when they are selected. Click once to resize and a second time to rotate.
There are 5 symbols in Reshape mode:
- Cyan Circle – Curved point
- Yellow Square – Angled point
- Orange Square with Bar – Stitch Angle
- Green Box – Start point of stitch path for object
- Red Plus – End point of stitch path for object
Clicking on the outline of the object will add an angled point. Right-clicking will add a curved point. You can select an existing point and hit spacebar to convert it from angled to curved and vice versa.
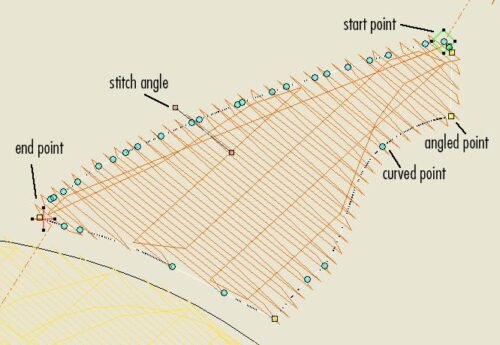
Fig 4 – Reshaping

Fig 5 – Edit Toolbox
Edit Toolbox
Add Holes allows you to create a shape inside of another shape, and enter to remove
Add Stitch Angle: click on 2 points, to indicate the desired angle, and hit enter to apply. To edit an existing stitch angle, move the 2 orange squares to adjust.
Fill Holes allows you to select an object with interior holes, and fill them – note, this will create overlap if there are other overlapping shapes.
Remove Overlap: To remove stitching overlaps from overlapping shapes, select the top shape, and click “Remove Overlaps” (recommended for combined files – auto digitize usually doesn’t create overlaps)
The Knife tool is used to cut a line through a shape to divide it into parts (for reshaping, or adjusting stitch angle) Make 2 points, and then hit enter to apply the cut.
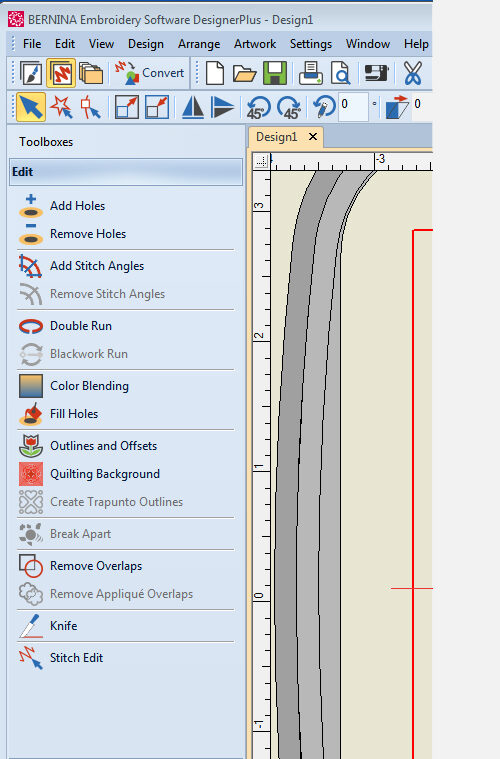
Fig 5 – Edit Toolbox

Fig 6 – Color Menu
Adjusting Color
The color palette at the bottom of your screen indicates the colors in your file. Swatches with a little blue box in the corner are colors that are used in your file, swatches without the blue box are not used anywhere in your file.
To add a color to your palette, click the + icon (Add Palette Color). This will add a new swatch to your palette and set it to be the Current Color.
To set this new swatch to your desired color, click the My Threads icon and double click the color you would like to use.
To assign a color from your palette to an object in your file, first select the desire color in your palette, making it the Current Color.
Click the paint can icon (Apply Current Color) and then click on the object that you would like to set to that color.
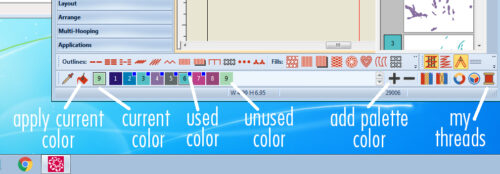
Fig 6 – Color Menu

Fig 7 – Color Film Sidebar
Reordering Objects
The Color Film sidebar shows you what objects are going to be stitched in what order. The machine will start at the top of the list and work its way down. Objects are grouped by color, but sometimes individual objects can get broken out and cause the machine to switch back and forth between colors. In the Fig 7 you can see that the machine will start by stitching color 6, then 5, then 4, then back to 6.
It can be useful to combine multiple objects of the same color so that you don’t have to frequently change the thread back and forth between colors.
To combine objects, simply click and drag the object you want to move and drop it on another object of the same color.
You can also reorder the objects by clicking and dragging them. If your design is a single color, or if you want to reorder objects of a single-color grouping, you can show the individual objects within a color group by clicking on the Show Objects button at the top of the Color Film sidebar.

Fig 7 – Color Film Sidebar
Saving
Save your work frequently. Go to File>Save As> and choose the “Bernina All-in-One V8” file type (.ART80). This file type will allow you to open this file again, and continue to edit the elements of your design. When you are ready to export your file for the embroidery machine, go to File> Export Machine File> and choose the TAJIMA file type (.DST). Move the USB from the embroidery machine over to the computer and save a copy of the .DST file on the USB. The file must be saved into the following file path on the USB: EMB>Embf>yourfilename.DST.