Using the Template
YOUR FILE MUST BE PROVIDED IN THE LASER CUTTER TEMPLATE found at https://go.illinois.edu/artTutorials
The template file is formatted to 18″x24″ – the size of the majority of stocked materials at A&D. The extra guides outside of the art board indicate the cuttable area of the bed – 24″ x 40″. If you are providing your own material that is larger than 18″x24″, size your art board up to the size of the material.
The template has separate layers for cutting and engraving (etching) to help organize your file for proofing by the lab assistant. There are color swatches in the template, that when applied to objects “tell” the laser cutter what to do:
- Laser Black (R=0, G=0, B=0) = Raster Engraving – removes a small amount of material from the surface.
- Laser Red (R=255, B=0, G=0) = Vector Line Cutting – the laser will cut all the way through the material sheet.
Photo images are converted to grayscale and treat varying levels of gray as varying depths of engraving (black = full power, white = no engraving)
All vector cutting line weights should be Laser Red 1pt “stroke” with no “fill.”
Type must be converted to outlines. Select type in Adobe Illustrator, and go to Create Outlines in the Type menu.
Solidly filled objects, and thick lines are treated as raster engraving, and can be made using Laser Black fills and/or strokes.
Raster engraving takes a longer time than vector cutting, because the lens must move incrementally back and forth to remove material from the surface. Thicker and harder materials also take longer to cut or engrave than thinner materials.
Materials
For convenience, the Service Desk stocks some common materials, although we cannot guarantee that any given material is available at any given time. You can find more information about stocked materials and their prices here.
You can also provide your own materials for cutting in the laser cutter. The lab assistant may need to test cut on a portion of the material that you provide – be sure to bring extra for testing. The laser system can’t cut everything. Please refer to the materials list below to see if your material is approved, and retain the original coating/packaging for the lab assistant to identify the material.
As a general rule, cutting many small sheets produces better results than cutting everything from one large sheet, because materials can warp with prolonged exposure to the heat produced by the laser.
Materials that may be cut/etched:
- Bristol Board
- Chipboard
- Corrugated Paper (cardboard)
- Foamcore
- Mat Board / Museum Board
- Drawing / Watercolor Paper Cover or Card Stock
- Epson Inkjet Paper
- Laser Prints
- Iron-on Paper
- Birch Plywood
- Basswood Composition
- Hardboard (not MDF i.e. masonite, tempered wood)
- Acrylic (Poly Methyl MethAcrylate)
- Plastic Corrugated Board (PolyPropolyene)
- Delrin (Poly TetraFlouroEthylene)
- Flexible Craft Foam*
- Transparency Film (Acetate)
- Mylar PETG (PolyEthylene Terephthalate) only less than .022″ thick
- PolyEster lightweight only
- PolyPropylene lightweight only
- Cotton*
- Industrial Wool*
- Artificial Felt*
- Natural Wool*
- Polyester* (cannot contain Vinyl)
- Leather* (bonded or hide; cannot contain Vinyl)
*All fabrics must be mounted
Laser Cutting Lightweight Materials
Laser cutting lightweight materials like paper, cloth, and leather is difficult because the exhaust system pulls so strongly it lifts the material from the bed. This can cause the sheet to move from the original position; to flap and strike the lens; or get pulled into the exhaust. This is a fire hazard. This is why all jobs must be watched during the entire laser process.
Lightweight materials will not be cut unless the material is properly secured. The final decision about whether or not your chosen method and material is acceptable will be completely at the discretion of the lab assistant.
There are 3 methods for securing lightweight materials – by creating vector line breaks and only partially cutting the material, layering the material between 2 heavier boards, or gluing the light weight material to a heavier board.
Broken Vector Lines or “Tabbing” Method
“Line breaking” means making tiny interruptions in a (normally continuous) vector line to keep the pieces from being completely cut from the original sheet.
To create line breaks (or “tabs”) In Adobe Illustrator:
- With the Selection Tool, choose the shape or object that you want to modify.
- Use the Add Anchor Point Tool to create two new anchor points about 1/8th of an inch apart on the line.
- Then use the Direct Selection Tool to select and delete the small segment in between the anchors to create a break.
- Repeat for each “tab” needed to secure the shape. Most shapes require 3 or more tabs to prevent them from separating during cutting. After the piece is cut on the laser cutter, you can use an Xacto blade to carefully cut the “tabs” and remove the objects from your sheet.
Layered Method
Place a light weight sheet between two pieces of flat, mat or chip board. You will be cutting through the top board, through the desired material sheet and lightly into the bottom board (but not through bottom board). This procedure holds the ‘middle’ light weight sheet in place, but sacrifices the two boards. Layering works especially well for saving small pieces that have vector lines that are not properly “broken” when created (see “broken vector line method”) and the small pieces are kept in place by the weight of the top board and are caught by the bottom board as they are freed from the material sheet.
A problem with the layering or “sandwich” method is getting consistent results when cutting through multiple sheets of whatever materials you bring as “heavy” boards. Also, layering will NOT allow “etching” or “engraving” elements on the surface of the light weight sheet. The lab assistant will have to do some experiments in advance of attempting your project and it’s a good idea to bring extra sheets and boards with you.
Glued Method
Gluing is a good procedure to use for flexible materials (fabric, leather) and it allows you to etch and engrave the surface. The downside of the glued process is the extra steps, and wet material that later must be dried and flattened. Drying can lead to shrinkage and distortion of the end product, especially with leather. A positive aspect of “gluing” allows you to etch and engrave the material surface.
In addition to the mounted material, keep a small sample piece of the material unmounted, so that the lab assistant can measure it for thickness.
Attach the material to some sort of appropriate substrate (like heavy weight chip board) for support during the cutting process. “UHU” brand glue stick or “YES” brand school paste work well, because both adhesives are acid free and remain water-soluble after the glue dries. Do NOT use glues that can’t be dissolved in water. Do not choose water-based glue labeled “permanent” because it contains PVA and cannot be cut on the laser cutter.
Apply a thin layer of glue to the board. Then carefully apply the material from one end of the board to the other (without trapping air between the material and the board). Allow material and board to dry flat and under pressure before attempting to laser cut.
When the project is done laser cutting, submerge and soak the entire board in a sink until the material floats freely from the board.

figure 1 – creating a registration mark in Illustrator
Print & Cut
To print graphics on the Epson Inkjet paper, and then cut them on the laser cutter, you will need to add registration marks to your print & cut file.
- Create the graphics you wish to print & cut, and then place them in the laser cutter template, on a new layer – name this layer “print”.
- Create your cut lines – make sure they are all on the normal “RED cut” layer.
- Create a new layer, on top of the other layers, and name this layer “registration”.
- The laser cutter software uses .25″ diameter black circles as registration marks. For proper alignment, 3 or more registration marks are required. The black circles need to be printed as part of the image, and be placed outside of the cut area. Place 3-5 black circles near, but outside of the cut area of your graphic.
- To print, turn off (toggle the visibility) of the RED cut and BLACK etch layers, so only the “print” and “registration” layers print. Be sure to follow the instructions on printing from Illustrator to the Epson inkjet printers for accurate printing. Don’t move anything in your file, and bring the print, and the file to the lab assistant.
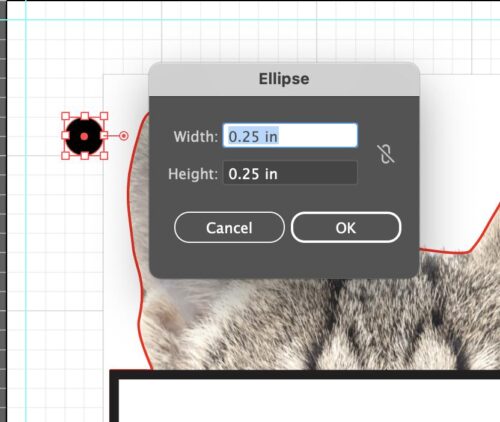
figure 1 – creating a registration mark in Illustrator
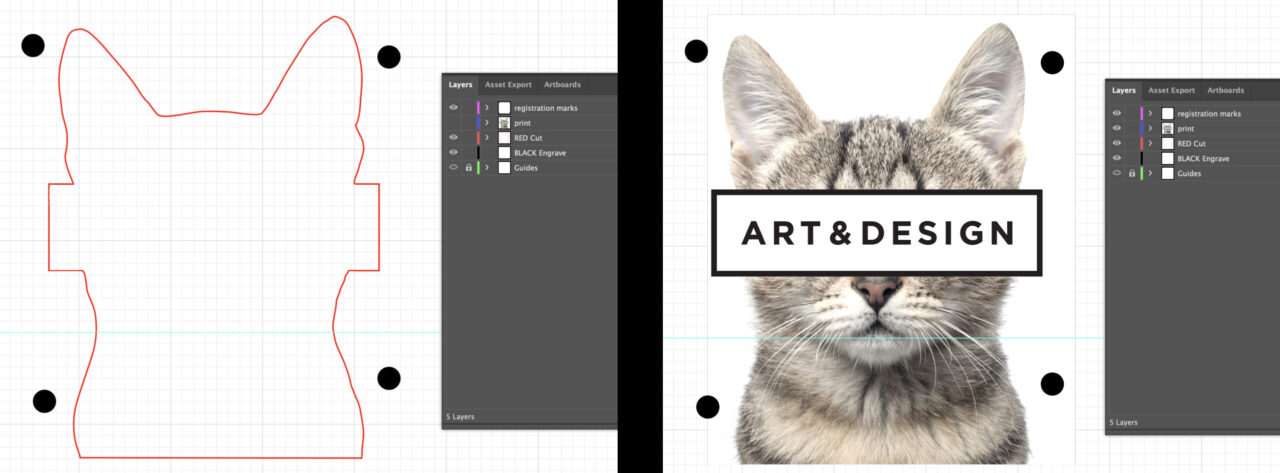
figure 2 – print & cut file setup with registration marks