
Fig 1 – Render Options Menu
Keyshot Network Rendering
Before you begin: Work locally. Always start by moving your file to the desktop. Opening and working on files from a USB (or other) drive can create problems.
Keyshot network rendering allows you to send Keyshot rendering jobs to a distributed cluster of computing resources. All workstations in the Art & Design labs are functioning as workers that donate a portion of their CPU cycles to the rendering system. This allows you to have access to more cores than a single computer. It also allows you to submit a job to the network, log off and leave, and return and download your finished job from any other computer on the network.
1. Open up the Render window by selecting Render > Render…
In the Output tab, specify the file name as [your netID]_[your filename].[filetype] to help you identify your job in the queue:
Ex.: arnold18_test_1.jpg
2. In the Options tab, set Mode to Send to Network, and click Send to Network.

Fig 1 – Render Options Menu

Fig 2 – Download and Delete Completed Job
Download and Delete Completed Job
3. The Keyshot Network Monitor will open and auto-login as Keyshot-student (you may see a brief pop-up saying it cannot connect, but this is okay. If it does not auto-login, enter wsaa-artrender2.ad.uillinois.edu for Manager Hostname (port 4847). Use the username Keyshot-student and the password student).
4. Your job will now appear in the render queue. A progress bar will appear to show you how far along the current job processing is.
Note: We have noticed that the estimated render times are not totally accurate, so do not put too much stock in what the software says the estimated time remaining is.
5. You may now close out of the program and even log off of the computer and your job will continue to render.
6. When your job is done, you may open the Keyshot Network Monitor application on any Windows computer in the lab. Find your job in the queue, right click on it and click download to download the file.
7. When you have successfully downloaded your file, please right click on the job and delete it from the queue.
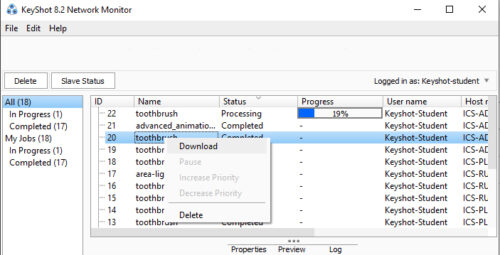
Fig 2 – Download and Delete Completed Job