Make a Reservation for the Advanced Inkjet Printer:
Printing from Photoshop CC to Epson Inkjet Printers
The Advanced Inkjet Printer is intended for advanced users wanting to utilize specialty paper and manage their own color workflows. Patrons must provide their own inkjet-compatible paper and are charged only for the ink used. This printer will deliver the best print quality on inkjet media. Printing on all other media must be approved by an Art & Design Facilities staff member in room 240, Art & Design Building.
This printer is a “print-at-your-own-risk” device. The School of Art & Design cannot offer refunds for misformatted prints and is not responsible for media that is damaged or lost in the printing process.
Advanced Inkjet Printer refunds are only granted when the printer has malfunctioned in a manner in which no output has been printed. If the print job had to be canceled on the printer before it printed, or never printed, the ink cost charged in Papercut can be refunded. Refunds will NOT be granted for user error or other unexpected results.
Refund requests must be submitted within 3 days of making the print. Refunds will be made at the discretion of the Art & Design staff.
You can submit refund requests here: https://forms.illinois.edu/sec/1291922134

Fig 1 – change black ink button
Before You Print
Determine Media and Ink Type
The Advanced Inkjet printer has different black ink types and must be set to use the ink type that matches your media.
MATTE INK (matte media) Paper Types
- Watercolor
- Cold Press
- Velvet Fine Art
- Exhibition Canvas
- Cardstock
PHOTO INK (glossy media) Paper Types
- Luster
- Gloss
- Pearl
To change the ink type, press the Black Ink Change Button on the printer and switch the ink to the desired type. This process takes several minutes.
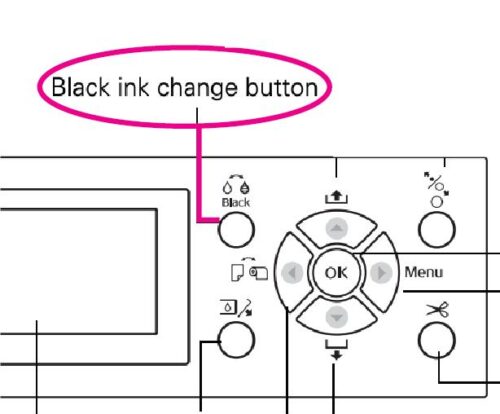
Fig 1 – change black ink button

Fig 2 – Clean Nozzle Check
Run a Nozzle Check
A nozzle check is recommended before printing to the Advanced Inkjet printers. To run a nozzle check: Load a sheet of scrap paper (see Load Paper section) Press the Menu button. Navigate Maintenance > Nozzle Check > then press OK. After the nozzle check prints, press the down arrow button to release the paper. A clear nozzle check should have no broken lines in any ink channels. If the nozzle check is not clear, ask the Lab Assistant for help running a cleaning.

Fig 2 – Clean Nozzle Check

Fig 3 – Navigating to the Library
Install an ICC Profile
For many types of inkjet media the manufacturer will provide an ICC profile–data which tells the computer how to provide the most accurate color for that specific media. Using the specific ICC profile created for your media and printer will provide you with the most accurate color and best print. Download the appropriate profile for your paper for an Epson SureColor P9000 printer from the manufacturer’s website. The website address is usually on the packaging. Save the profile on the desktop. Navigate to the Finder, and click on the Go tab in the top menu bar and hold down the Option key to show the Library. In the Library go ColorSync>Profiles. Drop the ICC profile in the Profiles folder. Your specific ICC profile will now be available in the Printer Profile dropdown in Photoshop when you go to print.
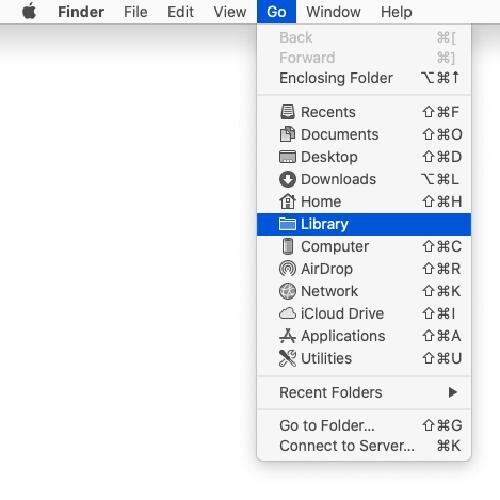
Fig 3 – Navigating to the Library

Fig 4 – sheet paper loading area
Loading Paper
The Advanced Inkjet printer accepts sheet and roll paper.
Sheet Paper
The minimum paper size that the printer will accept is 8”x10”.
Load your paper in portrait orientation (short edge first).
1. Make sure the printer is turned on and the roll paper cover is closed.
2. Press the Paper Source button (Left Arrow) until the Sheet icon appears on the LCD display.
3. Feed the sheet into the paper slot until it meets resistance. Make sure the right edge of the paper is straight and aligned with the vertical line on the roll paper cover.
4. Press the Down Arrow button. The sheet should feed into printing position automatically.
5. If you see a question on the display about paper settings, select Yes if the settings are correct, or No if you want to change the settings.
6. Print your page. After it is finished, the sheet will stay in the printer.
7. To release the print, press the Down Arrow button.
Roll Paper
2 or 3 inch core rolls can be loaded onto the printer. Ask the Lab Assistant for help with loading roll paper.
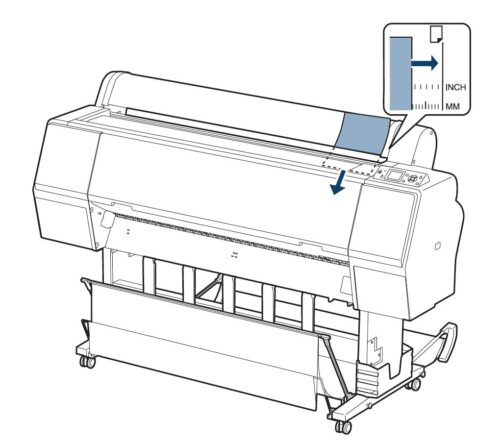
Fig 4 – sheet paper loading area

Fig 5 – Selecting Paper Size
Printing
1. Navigate to File>Print. Select ADBL-Advanced-Inkjet from the Printer dropdown.
2. Click Print Settings…
3. Open the Paper Size dropdown menu and select your paper size.*
3a. If you are printing from a roll select Manage Custom Sizes, and set the paper size to the dimensions of your document (HEIGHT OF PRINT MUST BE TALLER THAN 5″).
3b. If you are printing to sheet paper you can either set the dimensions in Manage Custom Sizes, or use a provided paper size. If you are using a provided paper size for sheet paper, make sure to choose the paper size (sheet) option (i.e. US Letter (Sheet)).
If you are trying to center a print on sheet paper (for example, if you are trying to align a print on the front and on the back of a sheet) when selecting your page size, select the “Paper Size (Sheet – Centering)” option. Leave the “center” option checked in the Photoshop print dialog box, and make your document the same size as your paper.
*This printer cannot print full bleed to the edge of the paper. If your image is the same size as your paper, you will notice a 1/8” crop on the top, left, and right sides of the paper and 1/2” on the bottom.
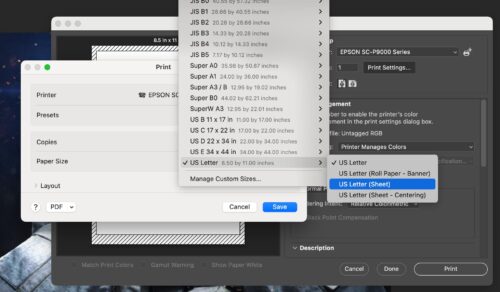
Fig 5 – Selecting Paper Size

Fig 6 – Printer Settings Menu Options
Printer settings
4. Click Printer Options and select Printer Settings.
For Page Setup, sheet or roll will be selected based on your paper size selection from the previous step.
Select the Media Type which best describes your media. Inkjet media will state which setting should be used in the ICC profile documentation. If your paper does not have an ICC profile use the setting that most closely describes your media.
Click OK.
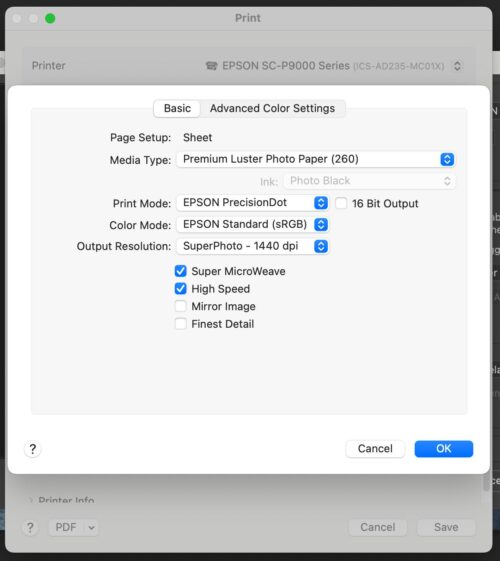
Fig 6 – Printer Settings Menu Options
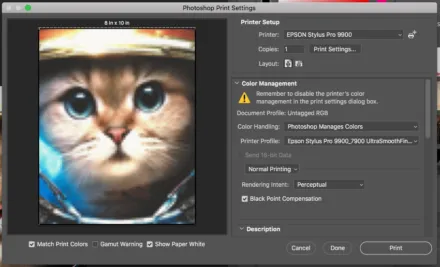
Fig 7 – Photoshop Print Menu
Photoshop Print Settings
Now that you are back in the Print Menu, your preview on the left should look like what you expect the print to look like on your page. Do not worry if it looks pixelated, that is just the nature of the preview.
5. Under the Color Management heading…
- Set Color Handling to Photoshop Manages Colors.
- Set Rendering Intent to Perceptual.
- Set Printer Profile to your ICC profile, or a matching Epson ICC profile.
Note: If your paper does not have a specific ICC profile, either set the Printer Profile the color space you created the document in, or to one of the available profiles that you think has similar attributes to the paper you are using. It is advisable that you print several test strips using your different profile options to see which one most accurately depicts your document.
6. Click Print!
7. Log in to Papercut to release your print to the printer
Remember, for sheet paper you will need to release the print, by pressing the Down Arrow button when it is complete.
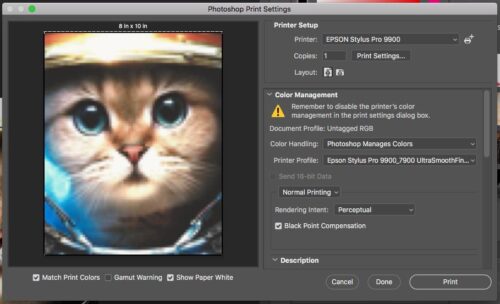
Fig 7 – Photoshop Print Menu