Quickstart Guide
Start your project by consulting with the Service Desk Lab Assistant for advice about the best way to plan your project.
The Roland is capable of printing and cutting a variety of materials. Certain materials, like canvas or banner, may be printed but not cut. Please see the Service Desk Lab Assistant for a complete list of available materials, sizing, and pricing.
Template Files
Go to the Tutorials & Templates page and download the Adobe Illustrator template file for the material that you would like to use.
The width of the artboard in each template is set to the maximum printable width of the material. For example, the 30″ vinyl has a max width of 28″, so the artboard for the 30″ White Vinyl is 28″ wide. Never adjust the width of the artboard.
The height of the artboard is set to 12″ by default. Resize the height of the artboard as needed to accommodate the height of your artwork and cut lines.
Note: Do not push artwork or cut lines flush up to the edge of the art board. If you do, you risk the printer not detecting it. Leave a tiny margin to be sure that all of your design is included in the print.

Fig 1 – Template Layers
Printing and Cutting (CutContour)
The Roland can print an cut on adhesive or fabric transfer vinyl. A standard cut (CutContour) means the machine will cut through the adhesive vinyl, but not through the paper backing.
The template file has a Print and a Cut layer. Place all artwork to be printed on the Print layer. Place all vector paths to be cut on the Cut layer.
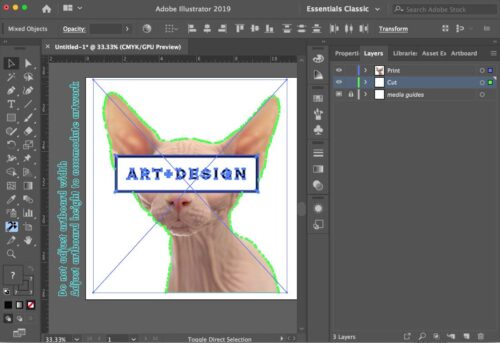
Fig 1 – Template Layers

Fig 2 – CutContour Setup
Green CutContour
All vector cut paths should be set to have no fill. Set the stroke to be the green CutContour swatch available in the Swatch Menu. Set the weight of the stroke to be .001 inches.
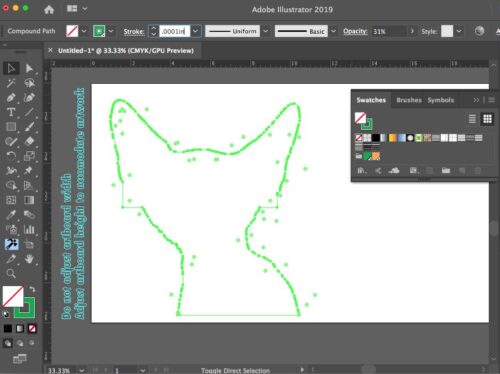
Fig 2 – CutContour Setup

Fig 3 – Printing/Cutting with Bleed
Bleed
When aligning your cut paths with your artwork, it is best to include a little bit of bleed. That means, when possible, have the cutting lines fall slightly inside your printed area. This way, if the cut is slightly misregistered from the print, it will be less obvious.
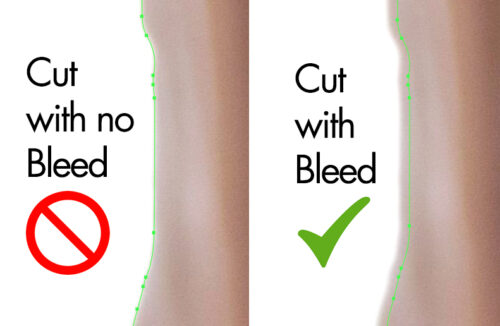
Fig 3 – Printing/Cutting with Bleed
Perforated Cutting (PerfCutContour)
In addition to standard cuts, the Roland can also perforate the backing material of certain media so that you can cut your artwork off of the backing paper completely. Perf cutting can only work on:
- Gloss WhiteAdhesive Vinyl
- Matte WhiteAdhesive Vinyl
- Clear Adhesive Vinyl
PerfCutContour lines are set up the same way as normal CutContour lines except that they use the PerfCutContour swatch:
- Place them on the Cut layer
- Set fill to nothing
- Set stroke to PerfCutContour (orange)
- Set stroke weight to .001 inches
For a clean cut, it is recommended that you also perform a normal CutContour on top of your PerfCut. Just make a copy of your cut line in the same place. One should be set to the PerfCutContour orange and the other to the CutContour green.
Be sure to space out PerfCutContour cuts by 1/2″, or the backing may tear apart while cutting.
Printing Multiple Copies
If you need to print multiple copies of a sticker, or a set of stickers, just make one copy of the sticker (or set) in your design. Tell the lab assistant how many copies you want and they can easily format the file to print the number you need.

Fig 4 – White Underlay Options
White Ink
You can use white ink as an underlay or as a spot color when printing on clear or colored media.
White Underlay
Printing with a white underlay means the printer will flood a layer of white ink behind all printed areas in your design. This will make your print appear more opaque when printing on clear media. The printing software considers “print area” to be any area of the image that has 1% or more color. Areas that are 100% white will not be seen as “print area”, and will remain clear – no white ink will be printed. If you are printing with white underlay and there are areas of your print that you want to actually be white with no color on top, set them to the White For Underlay swatch in the template file.
Tell the lab assistant that you would like to print your file with white underlay in the print area.
Note: You can also have the lab assistant set the white underlay to print outside printed area (the inverse of the normal white underlay, it will print white wherever there is no data in your image). Or to print white under the entire image area, which will flood your entire artboard with white and print your image on top of that. In the diagram you can see the three options. The light pink indicates where white ink will be printed.
Spot White
If you do not want to flood your printed area with white, but only want white to print at certain places that you manually indicate, use the RDG_WHITE swatch in the template to set the areas that you want to print white.
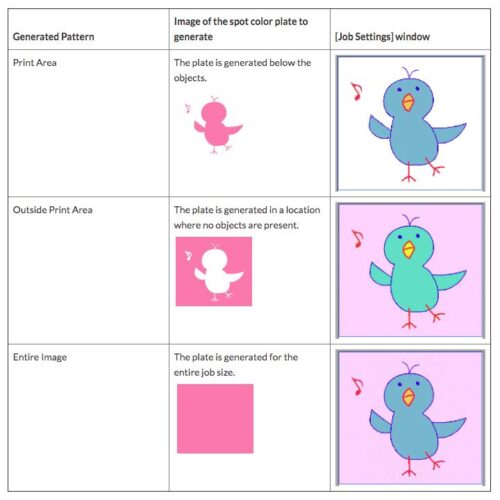
Fig 4 – White Underlay Options